Dynamic Values
Dynamic values allow you to automatically populate controls with information that is unique to each checklist — without having to type the same data more than once.
There are two ways to use dynamic values, depending on the type of control you are working with:
Dynamic Value Placeholders — Insert inline placeholders (e.g.
{{current_date}}) into Text and Mail-To controls. The placeholder is replaced with the live value when the checklist is viewed.Dynamic Value Bindings — Bind an input control (such as Short Text, Date & Time, Drop-Down, etc.) to a global value or another control in the same checklist. The bound control is pre-filled automatically when the checklist is loaded or when the value changes.
Dynamic Value Placeholders
Dynamic value placeholders are supported by the Text and Mail-To controls. They allow you to embed dynamic content inline within the control's body.
There are two types of dynamic value you can use as placeholders:
- Content Control Dynamic Values — Linked to other controls within your checklist. Updated live whenever the linked control's value changes.
- Global Dynamic Values — Linked to global data such as the current date, checklist URL, or the current user's email address. Resolved when the checklist is loaded.
Example
As part of your customer onboarding process you collect the customer's name and email address. You can set up a welcome email using the Mail-To control and push the customer's email address into the To field and the customer's name into the Body field.
That way, the email is automatically populated instead of having to copy values manually. If the customer name or email is updated, the Mail-To control always contains the correct values.
Demo Video
We have created a demo video showing how dynamic values work with the Mail-To control.
Available Controls as Dynamic Value Sources
The following controls can be used as Content Control Dynamic Values:
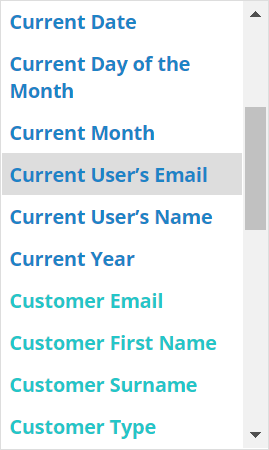
Available Global Dynamic Values
The following global dynamic values are available as placeholders:
- Checklist Created Date —
{{checklist.created_date}} - Checklist Due Date —
{{checklist.due_date}} - Checklist Name —
{{checklist.name}} - Checklist Shared URL —
{{checklist.shared_url}} - Checklist Start Date —
{{checklist.start_date}} - Checklist URL —
{{checklist.url}} - Current Date —
{{current_date}} - Current Day of the Month —
{{current_date.day}} - Current Month —
{{current_date.month}} - Current User's Email —
{{current_user.email}} - Current User's Name —
{{current_user.name}} - Current Year —
{{current_date.year}} - Task Due Date —
{{task.due_date}} - Task Name —
{{task.name}} - Task URL —
{{task.url}} - Team Name —
{{team.name}} - Template Name —
{{template.name}} - Template URL —
{{template.url}}
How to Set Up Placeholders
Dynamic value placeholders are set within your template.
Open your template and select the task where your Text or Mail-To control is located.
From the control you can either type {{ or click the 'Insert Dynamic Value' button (shown below).

A popup selection window will open. All of the available dynamic values will be listed in alphabetical order.
Content Control Dynamic Values are displayed in turquoise.
Global Dynamic Values are displayed in blue.
You can type to narrow the list of results.
Once you have found the dynamic value, select it and it will be inserted into the control.
Dynamic value placeholders are displayed in blue text and are wrapped in curly braces.

You can insert multiple dynamic values into a control.
You can delete a dynamic value using your backspace or delete key.
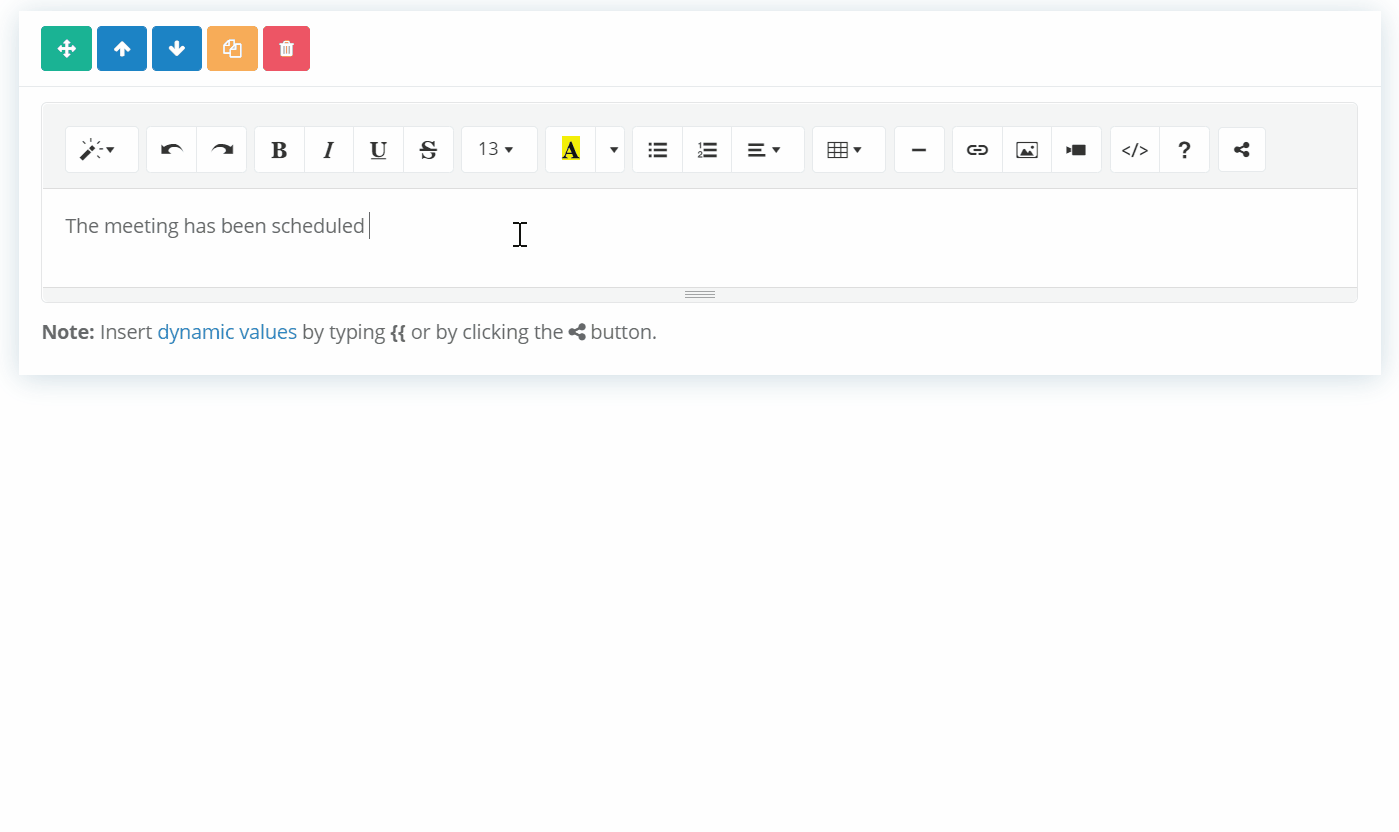
Using Placeholders in the Text Control
Click the 'Insert Dynamic Value' button located in the top right corner of the text editor to insert a dynamic value at the bottom of the editor. For more control over placement, type {{ to insert the value inline.
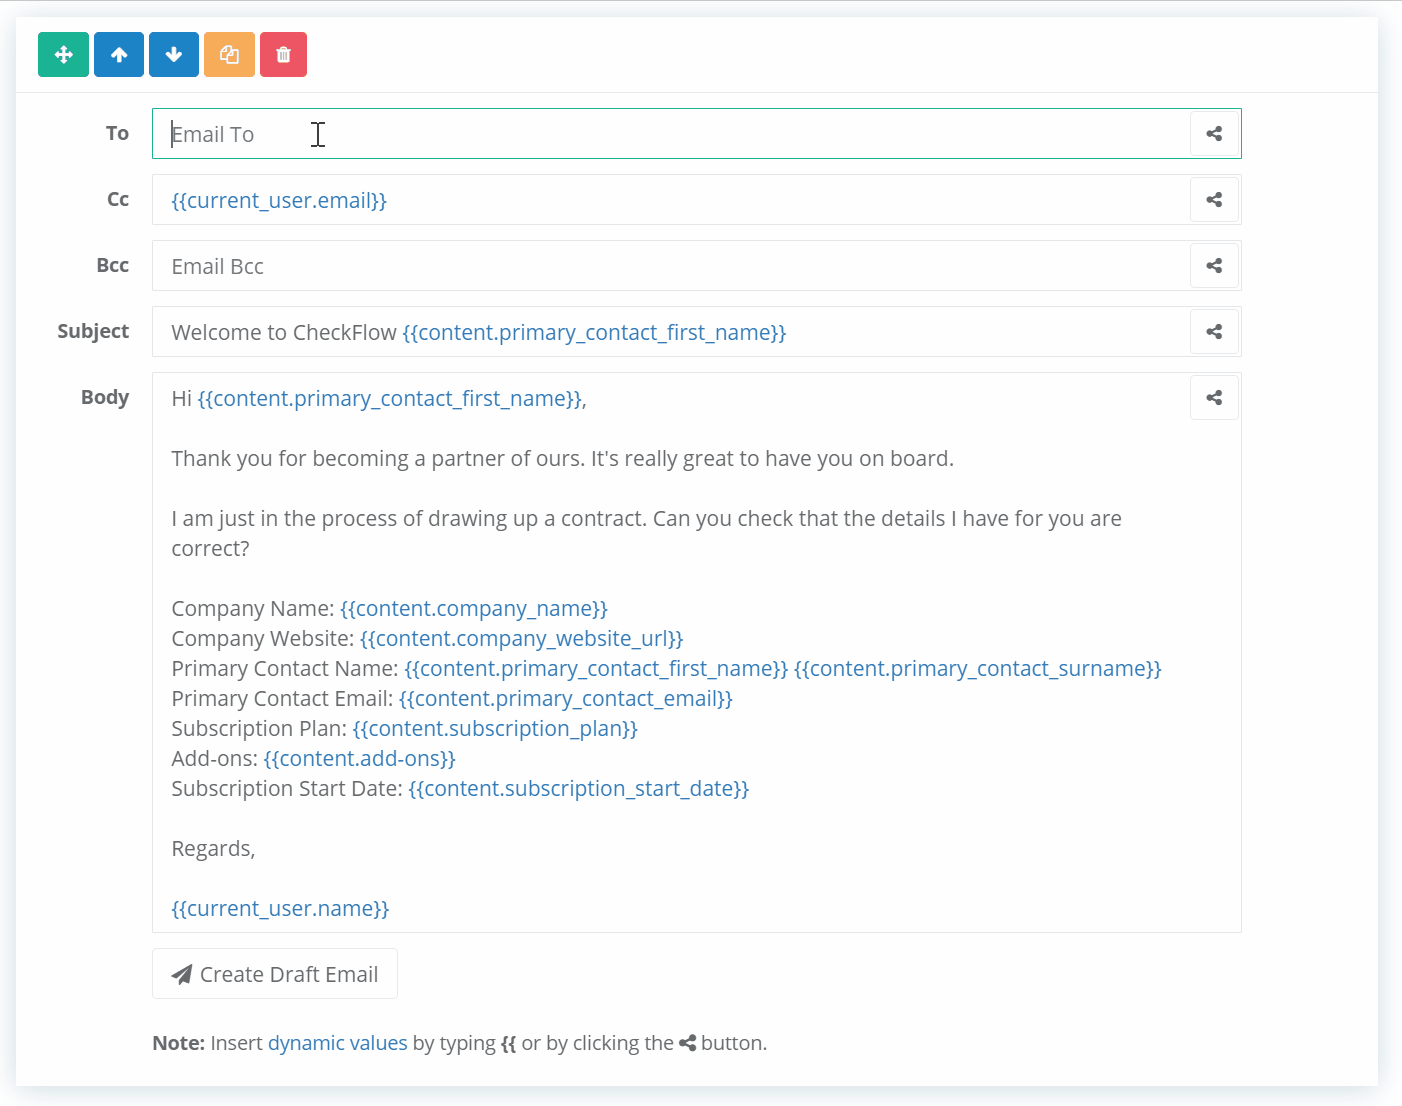
Using Placeholders in the Mail-To Control
Similarly to the Text control, click the 'Insert Dynamic Value' button or type {{ to insert a dynamic value. The Mail-To control has five fields (To, Cc, Bcc, Subject and Body) — each has its own 'Insert Dynamic Value' button on the far right.
How Placeholders Work in a Checklist
Content Control Dynamic Values are updated whenever the value of the linked control changes.
Global Dynamic Values are resolved when the checklist is loaded.
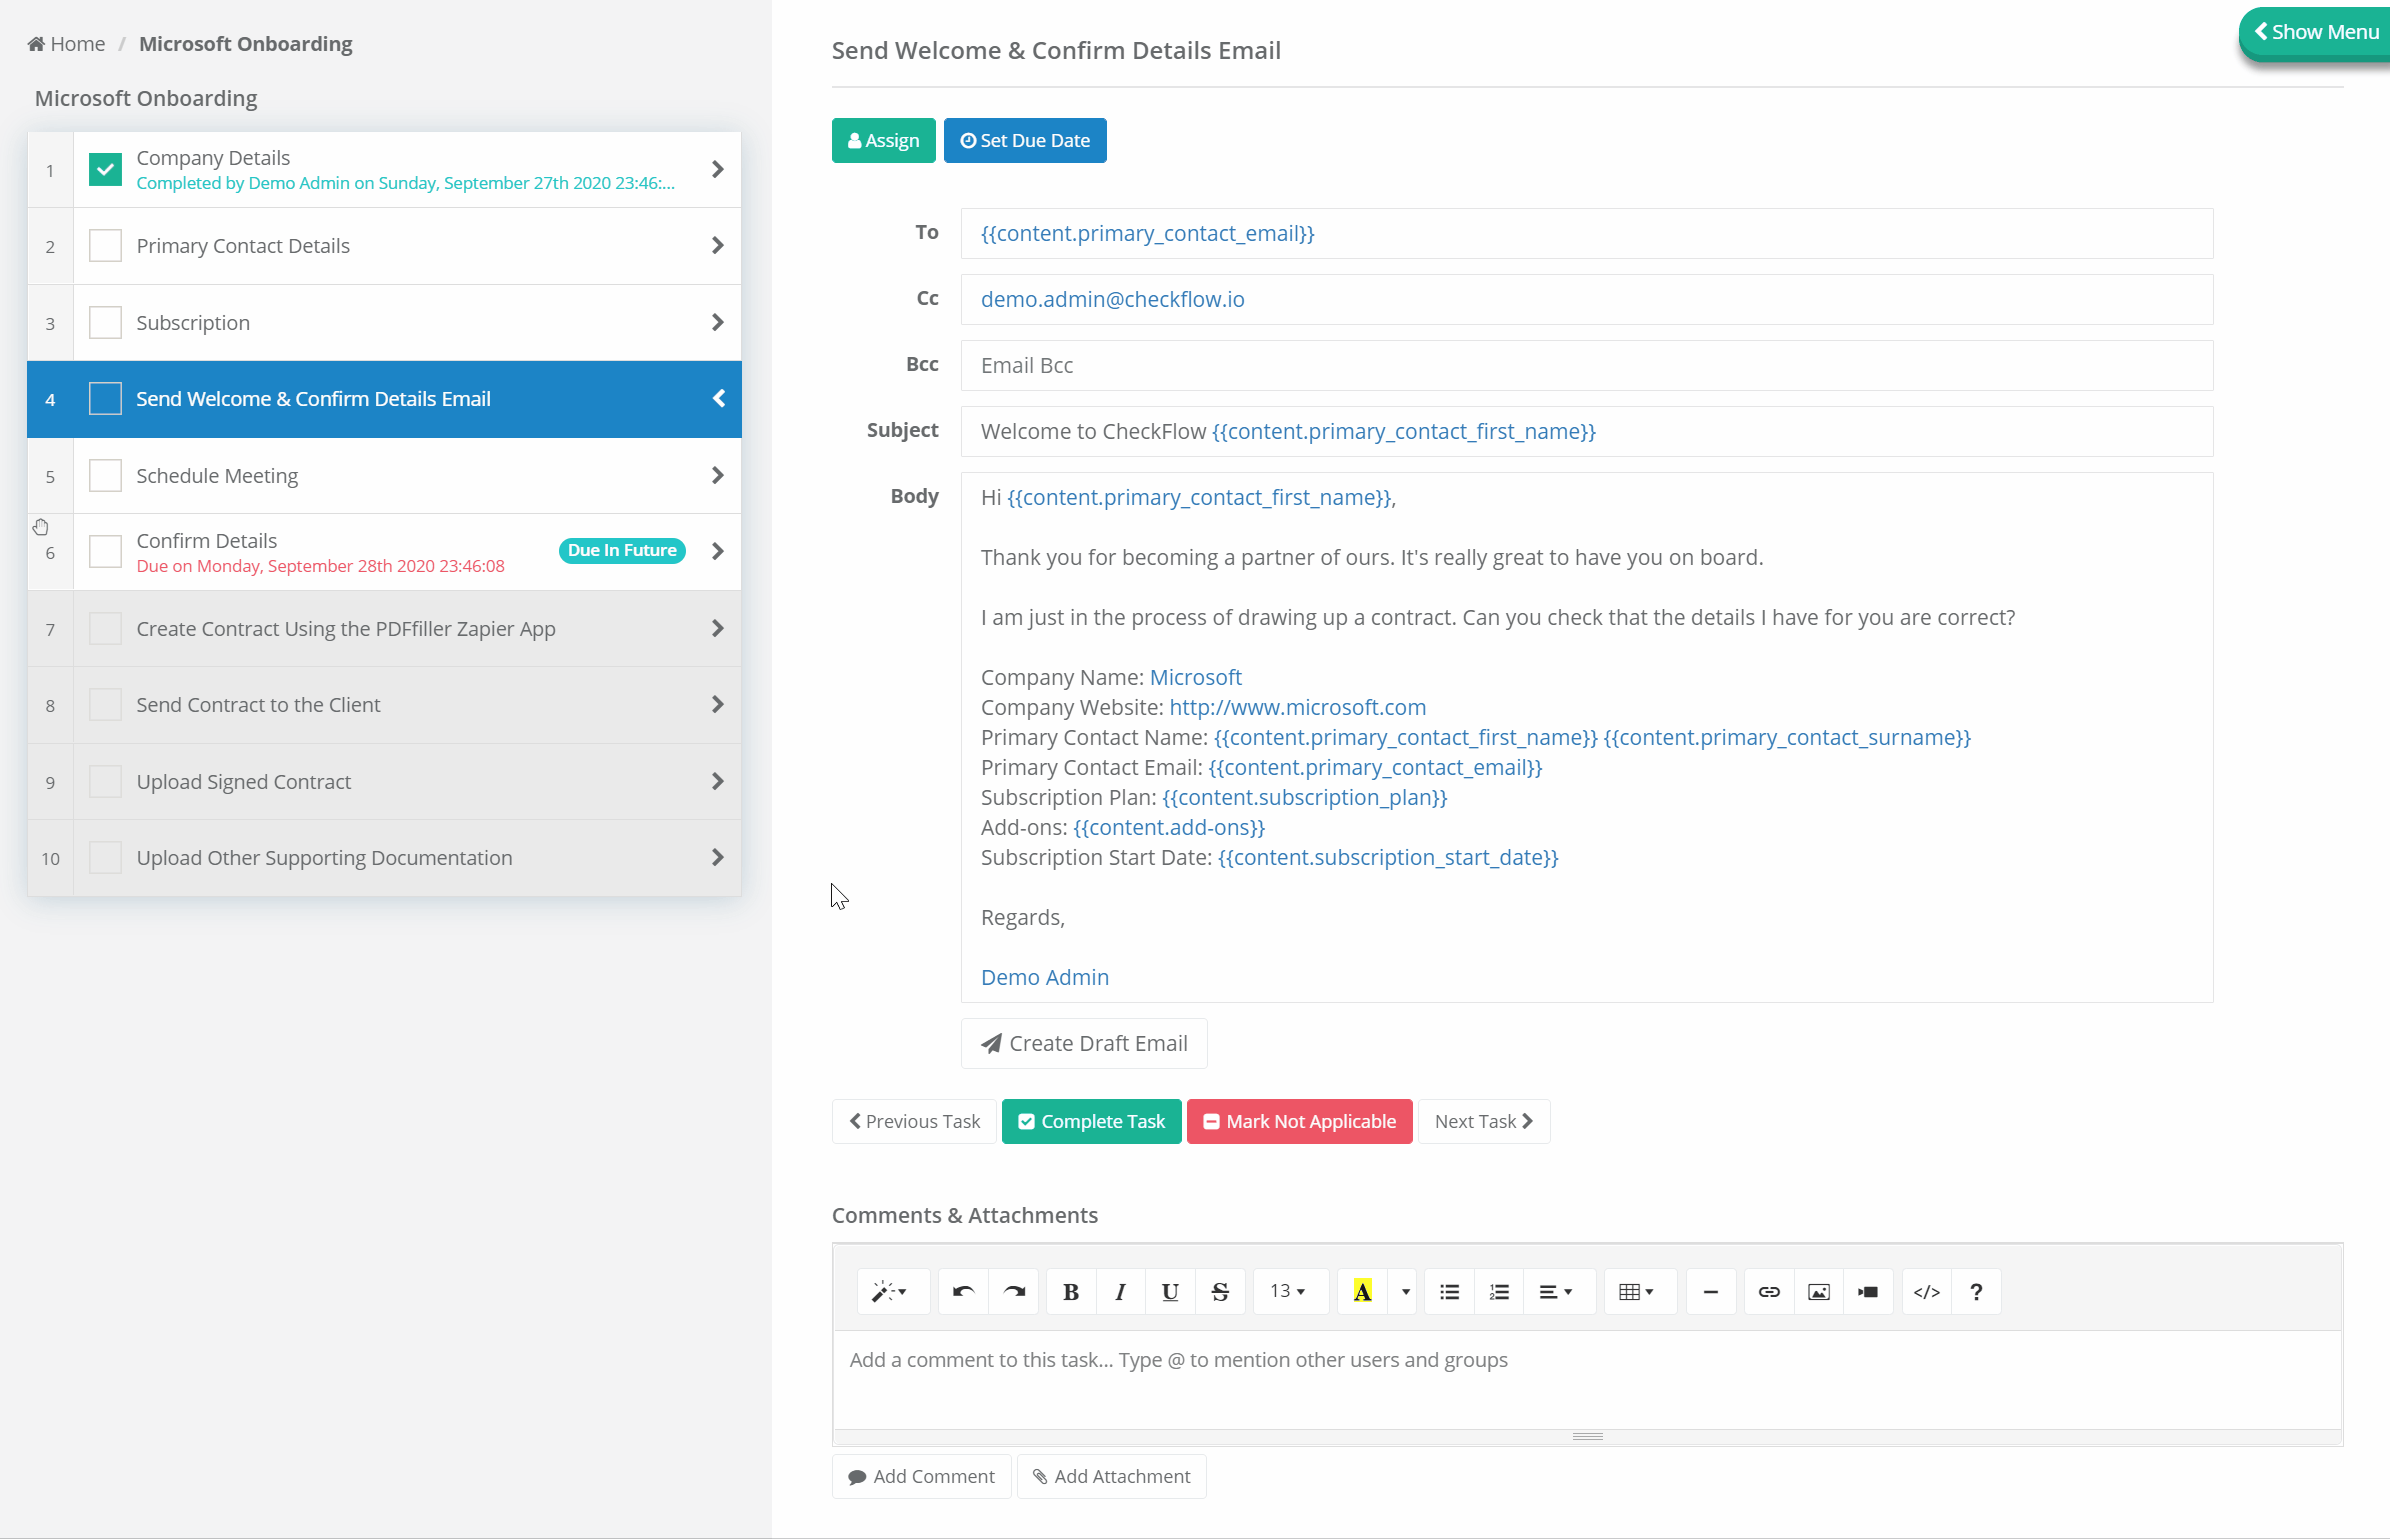
In the example below, there are several dynamic values of both types in a Mail-To control. The global dynamic values are already set. The content dynamic values (Primary Contact First Name, Primary Contact Surname and Primary Contact Email) are updated in the checklist, and those values are automatically pushed to the dynamic value placeholders in the Mail-To control.
Dynamic Value Bindings for Input Controls
Dynamic Value Bindings allow you to bind an input control so that it is automatically pre-filled when a checklist is loaded or when the value changes. This removes the need to re-enter the same information in multiple places.
You can bind a control to:
- A Global Dynamic Value (global data such as the current date or the current user's email address).
- A Content Control Dynamic Value (the current value of another control in the same checklist).
When a content control binding is active, the bound control also updates live as the source control's value changes.
Supported Controls
Dynamic Value Bindings can be applied to the following input controls:
| Control | Global Dynamic Values | Content Control Dynamic Values |
|---|---|---|
| Short Text | All standard dynamic values | ✓ |
| Long Text | All standard dynamic values | ✓ |
| Email Input | Current User's Email only | ✓ |
| Date & Time | Date-based values only* | ✓ |
| Website | URL-based values only† | ✓ |
| Video | URL-based values only† | ✓ |
| Embed | URL-based values only† | ✓ |
| Drop-Down | Not supported | ✓ |
* Compatible date-based standard dynamic values: Current Date, Checklist Created Date, Checklist Start Date, Checklist Due Date, Task Due Date.
† Compatible URL-based standard dynamic values: Checklist URL, Checklist Shared URL, Task URL, Template URL.
How to Create a Binding
Bindings are created in your template.
- Open your template and select the task containing the control you want to bind.
- Click the Content Settings button (the cog icon) at the top of the control box.
- Click Bindings from the sub-menu that appears.
The Bindings popup will open. Select Dynamic Value as the binding type.
A dropdown will be displayed showing the available dynamic values for your control type, grouped into two sections:
- Content Control Dynamic Values — Controls from within the same template that can act as a source value. These are listed by task and control name.
- Global Dynamic Values — Global values such as the current date, current user's email, and checklist URL. Only values compatible with the control type are shown.
Select the dynamic value you want to bind to and click Save.
A DV badge will appear on the control to indicate that a binding is active. You can hover over the badge to see the binding details.
How Bindings Work in a Checklist
When a checklist is created or loaded, any controls with active bindings are automatically pre-filled with the resolved value.
For Global Dynamic Value bindings, the value is resolved when the checklist is created and does not change.
For Content Control Dynamic Value bindings, the bound control updates live as the source control's value changes. For example, if you bind a Short Text control (B) to another Short Text control (A), typing into control A will automatically update control B.
Overriding a Bound Value
You can manually edit a control that has a Dynamic Value Binding.
For Global Dynamic Value bindings this edit will never be overwritten as the dynamic value is only resolved once at checklist creation.
For Content Control Dynamic Value bindings your edit will be overwritten if the source control's value changes again.
Removing a Binding
To remove a binding, open the control's Content Settings menu in the template, click Bindings. From the popup select No Binding, and click Save.