Getting Started
This article will cover the basics so that you can quickly get started.
We will show you how to:
- Create a Template.
- Create a Checklist derived from your Template.
- Update Tasks in your Checklist.
- View your Checklist from the Dashboard.
What is CheckFlow?
CheckFlow is a cloud-based software solution that allows you to create and manage your team's process documents using powerful checklists.
Create process templates, run instances of your process templates as checklists, and monitor progress in real-time using the live dashboard.
With CheckFlow you can:
- Add read-only content to your tasks to give users instructions, images, videos, files, and more.
- Capture data using input controls. Ensure a task cannot be completed until specific information has been entered. Controls include text boxes, date & time pickers, dropdowns, file uploads, sub-tasks, and more.
- Assign tasks to individual users or groups.
- Set due dates on tasks and get notified when they are overdue.
- Control the order in which tasks are completed using halt tasks.
- Show and hide tasks and controls dynamically using conditional logic.
- Automatically populate fields using dynamic values.
- Schedule checklists to run automatically on a recurring schedule.
- Apply fine-grained permissions to templates, checklists, and individual tasks.
- Analyse your data using the built-in reports and analytics.
Create Your First Process Template
- Log in to your CheckFlow account.
- From the toolbar on the left click on the green button with the plus sign. This is the Quick Create button. You can create templates, checklists, and schedules using this button.
- Click New Blank Template.
- You will be redirected to the Template Designer and your new blank template will be displayed.
Give Your Template a Name and Description
The first thing you need to do is name your template.
Click on the red text 'Click to enter template name (required)' and the label will switch to a text box. Enter the name of your template.
You can also enter a description for your template. The description is optional. Click on the grey text 'Click to enter template description (optional)' below the template name to add one.
Add Tasks and Headings To Your Template
When you create a new template a blank task is automatically created for you.
Click on the task to enter its name.
To add more tasks either press the Enter key while in an existing task, or click the + Task button in the toolbar at the bottom of the task list.
It can be beneficial to add headings to break up your tasks into sections for better readability. Headings do not have a checkbox — they are read-only.
To add a heading, click the + Heading button in the toolbar at the bottom of the task list.
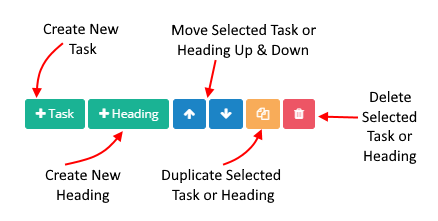
You can drag and drop tasks and headings to change their order. Hover over the order number on the left and your cursor will change to a cross-hair. You can also use the up and down buttons in the toolbar to reorder items.
You can add as many tasks and headings as you need. There is no limit.
Add Content To Your Tasks
One of the most powerful things about CheckFlow is that you can add content to your tasks using controls.
There are two types of controls: Content Controls display information to the user, and Input Controls capture data from the user.
Content Controls
| Control | Description |
|---|---|
| Text | Rich text editor for instructions, notes, and formatted content. |
| Image | Display an uploaded image. |
| Video | Display an uploaded or embedded video. |
| File | Display a downloadable file attachment. |
| Mail-To | A pre-written email that users can send with one click. |
| Embed | Embed an external website or tool via an iframe. |
| Separator | A horizontal dividing line to break up task content. |
Input Controls
| Control | Description |
|---|---|
| Short Text | A single-line text input. |
| Long Text | A multi-line text input. |
| An email address input with format validation. | |
| Website | A URL input with format validation. |
| File Upload | Prompt the user to upload one or more files. |
| Date & Time | A date, time, or date and time picker. |
| Drop-Down | A single-select list of options. |
| Multi-Choice | A multi-select list of options. |
| Sub-Tasks | A checklist of sub-items within a task. |
| Members | Select one or more team members or groups. |
| Table | A grid of editable cells for structured data entry. |
| Linked Checklist | Create a child checklist from within a task. |
Controls are added from the Controls Toolbar on the right side of the Template Designer. Drag and drop a control onto the task content area, or click it to add it below any existing controls.
Each control has properties you need to configure. For example, a Short Text control just needs a label, while a Drop-Down control also needs its list of options defined.
You can add a tooltip to any control to display a help message when a user hovers over it.
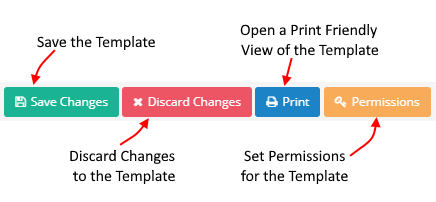
Save Your Template
To save your template click the Save Changes button in the toolbar at the top of the Template Designer.
Every save creates a new version of your template automatically. If you have any open checklists based on a previous version, you will be asked whether you want to update them. See Save a Template and Template Versioning for more details.
Create a Checklist Derived From Your Template
Now that you have created your template you can create checklists based on it.
Click the Quick Create button (the green plus icon on the left toolbar) and select New Checklist.
A form will appear. Choose the template you want to use and enter a name for the checklist. Then click Create & Run New Checklist.
The checklist will be created and opened for you.
Complete Some Tasks
There are two ways to complete a task. You can click the checkbox in the task list, or click the Complete Task button at the bottom of the task content area.
If a task contains one or more required controls you must fill them in before the task can be completed. You will receive an error message if you try to complete a task with unfilled required controls.
When a task is completed the date and time, and the name of the user who completed it, are recorded beneath the task.
Once all tasks have been completed the checklist is also marked as completed.
View Your Checklist From The Dashboard
You can view your checklists from the Dashboard. Click the Home icon on the left navigation bar to go to the Dashboard.
Your checklists are displayed in a grid. Use the filters and search box to find specific checklists. By default, the filters show all checklists that are scheduled, in progress, or recently completed (completed within the previous 24 hours).
If a checklist is updated by another team member your dashboard is automatically updated in real-time — no refresh needed.
Click the plus icon to the left of a checklist name to expand it and reveal its tasks.
If a task cannot be completed it will be because of one of the following reasons:
- The task is assigned exclusively to one or more other users, or to groups you are not a member of.
- You have permission to view the task but not to complete it.
- The task has one or more required controls that have not been filled in.
What to Explore Next
You have created your first template and run your first checklist. Here are some of the features to explore as you build out your processes:
| Feature | Description |
|---|---|
| Task Assignments | Assign tasks to specific users or groups. |
| Task Due Dates | Set due dates on tasks to track deadlines. |
| Conditional Logic | Show and hide tasks and controls based on user input. |
| Dynamic Values | Automatically carry data from one control into another. |
| Template Parameters | Prompt for information when a checklist is created. |
| Enforce Task Order | Use halt tasks to control the sequence of completion. |
| Custom Notifications | Send automated emails when tasks are completed. |
| Scheduling | Run checklists automatically on a recurring schedule. |
| Permissions | Control who can view and edit your templates and checklists. |
| Reports | Analyse your checklist data with customisable reports. |
| Groups | Organise team members into groups for easier assignment. |
| Template Versioning | Every save creates a version — view history and revert any time. |