Dynamic Due Dates
Dynamic due dates allow you to set a task’s due date based on rules you define within your template. Each of your checklists inherits these rules and applies them automatically at run time.
There are two ways to define a dynamic due date:
- Date Offset — Set the due date a fixed amount of time before or after an anchor point (such as the checklist start date, a task completion, or a date control).
- Calendar Position — Pin the due date to a position in the calendar relative to when the checklist starts (such as the last day of the month, or the next Friday).
Example Use Cases
- Your process timings are tied to the start date. All of your tasks have a due date based on the number of minutes, hours, days or months after your process has started.
- Your new employee starts in 4 weeks. You have a set of tasks that must be completed prior to their start so that they have everything they need on their first day (before the "Hire Date" control value).
- Your new employee also has to complete their orientation and training by the end of their first two weeks (after the "Hire Date" control value).
- Your accounting team have sent an invoice to one of your customers. They must also check if the invoice has been paid 7 days after the invoice has been sent (after the "Send Invoice" task has been completed).
- Your monthly close process must always be completed by the last weekday of the current month.
- A weekly review task should always be due the next Friday after the checklist starts.
Date Offset Due Dates
A date offset due date is anchored to a point within the checklist and offset by a duration you specify.
Anchors
Date offset due dates can be anchored to:
- The checklist start date
- The completion of the previous task
- The completion of a specific task
- Any date control within your checklist
Direction
You can specify that the offset triggers after:
- The checklist has started
- The completion of a task
- The value entered in to a date control within your checklist
The offset can also trigger before:
- The value entered in to a date control within your checklist
The rules will automatically adjust the due date of tasks as various actions are taken within your checklist.
Calendar Position Due Dates
A calendar position due date pins the due date to a specific position in the calendar, calculated from the checklist start date. Unlike date offsets, calendar dates are not tied to task completions or control values — they always resolve to a well-known point in the calendar.
Available Calendar Dates
| Group | Option |
|---|---|
| Day of Week | Next Weekday, Next Monday, Next Tuesday, Next Wednesday, Next Thursday, Next Friday, Next Saturday, Next Sunday |
| Month | First Day of Next Month, First Weekday of Next Month, Last Day of Current Month, Last Weekday of Current Month |
| Quarter | Last Day of Current Quarter, Last Weekday of Current Quarter, First Day of Next Quarter, First Weekday of Next Quarter |
| Year | Last Day of Current Year, Last Weekday of Current Year, First Day of Next Year, First Weekday of Next Year |
You can also set a time alongside the calendar date (for example, last day of the month at 09:00). The time is interpreted in the timezone of the user who configured the rule, and is stored correctly to account for daylight saving time.
Creating a Dynamic Due Date
Dynamic due dates are created within your process template.
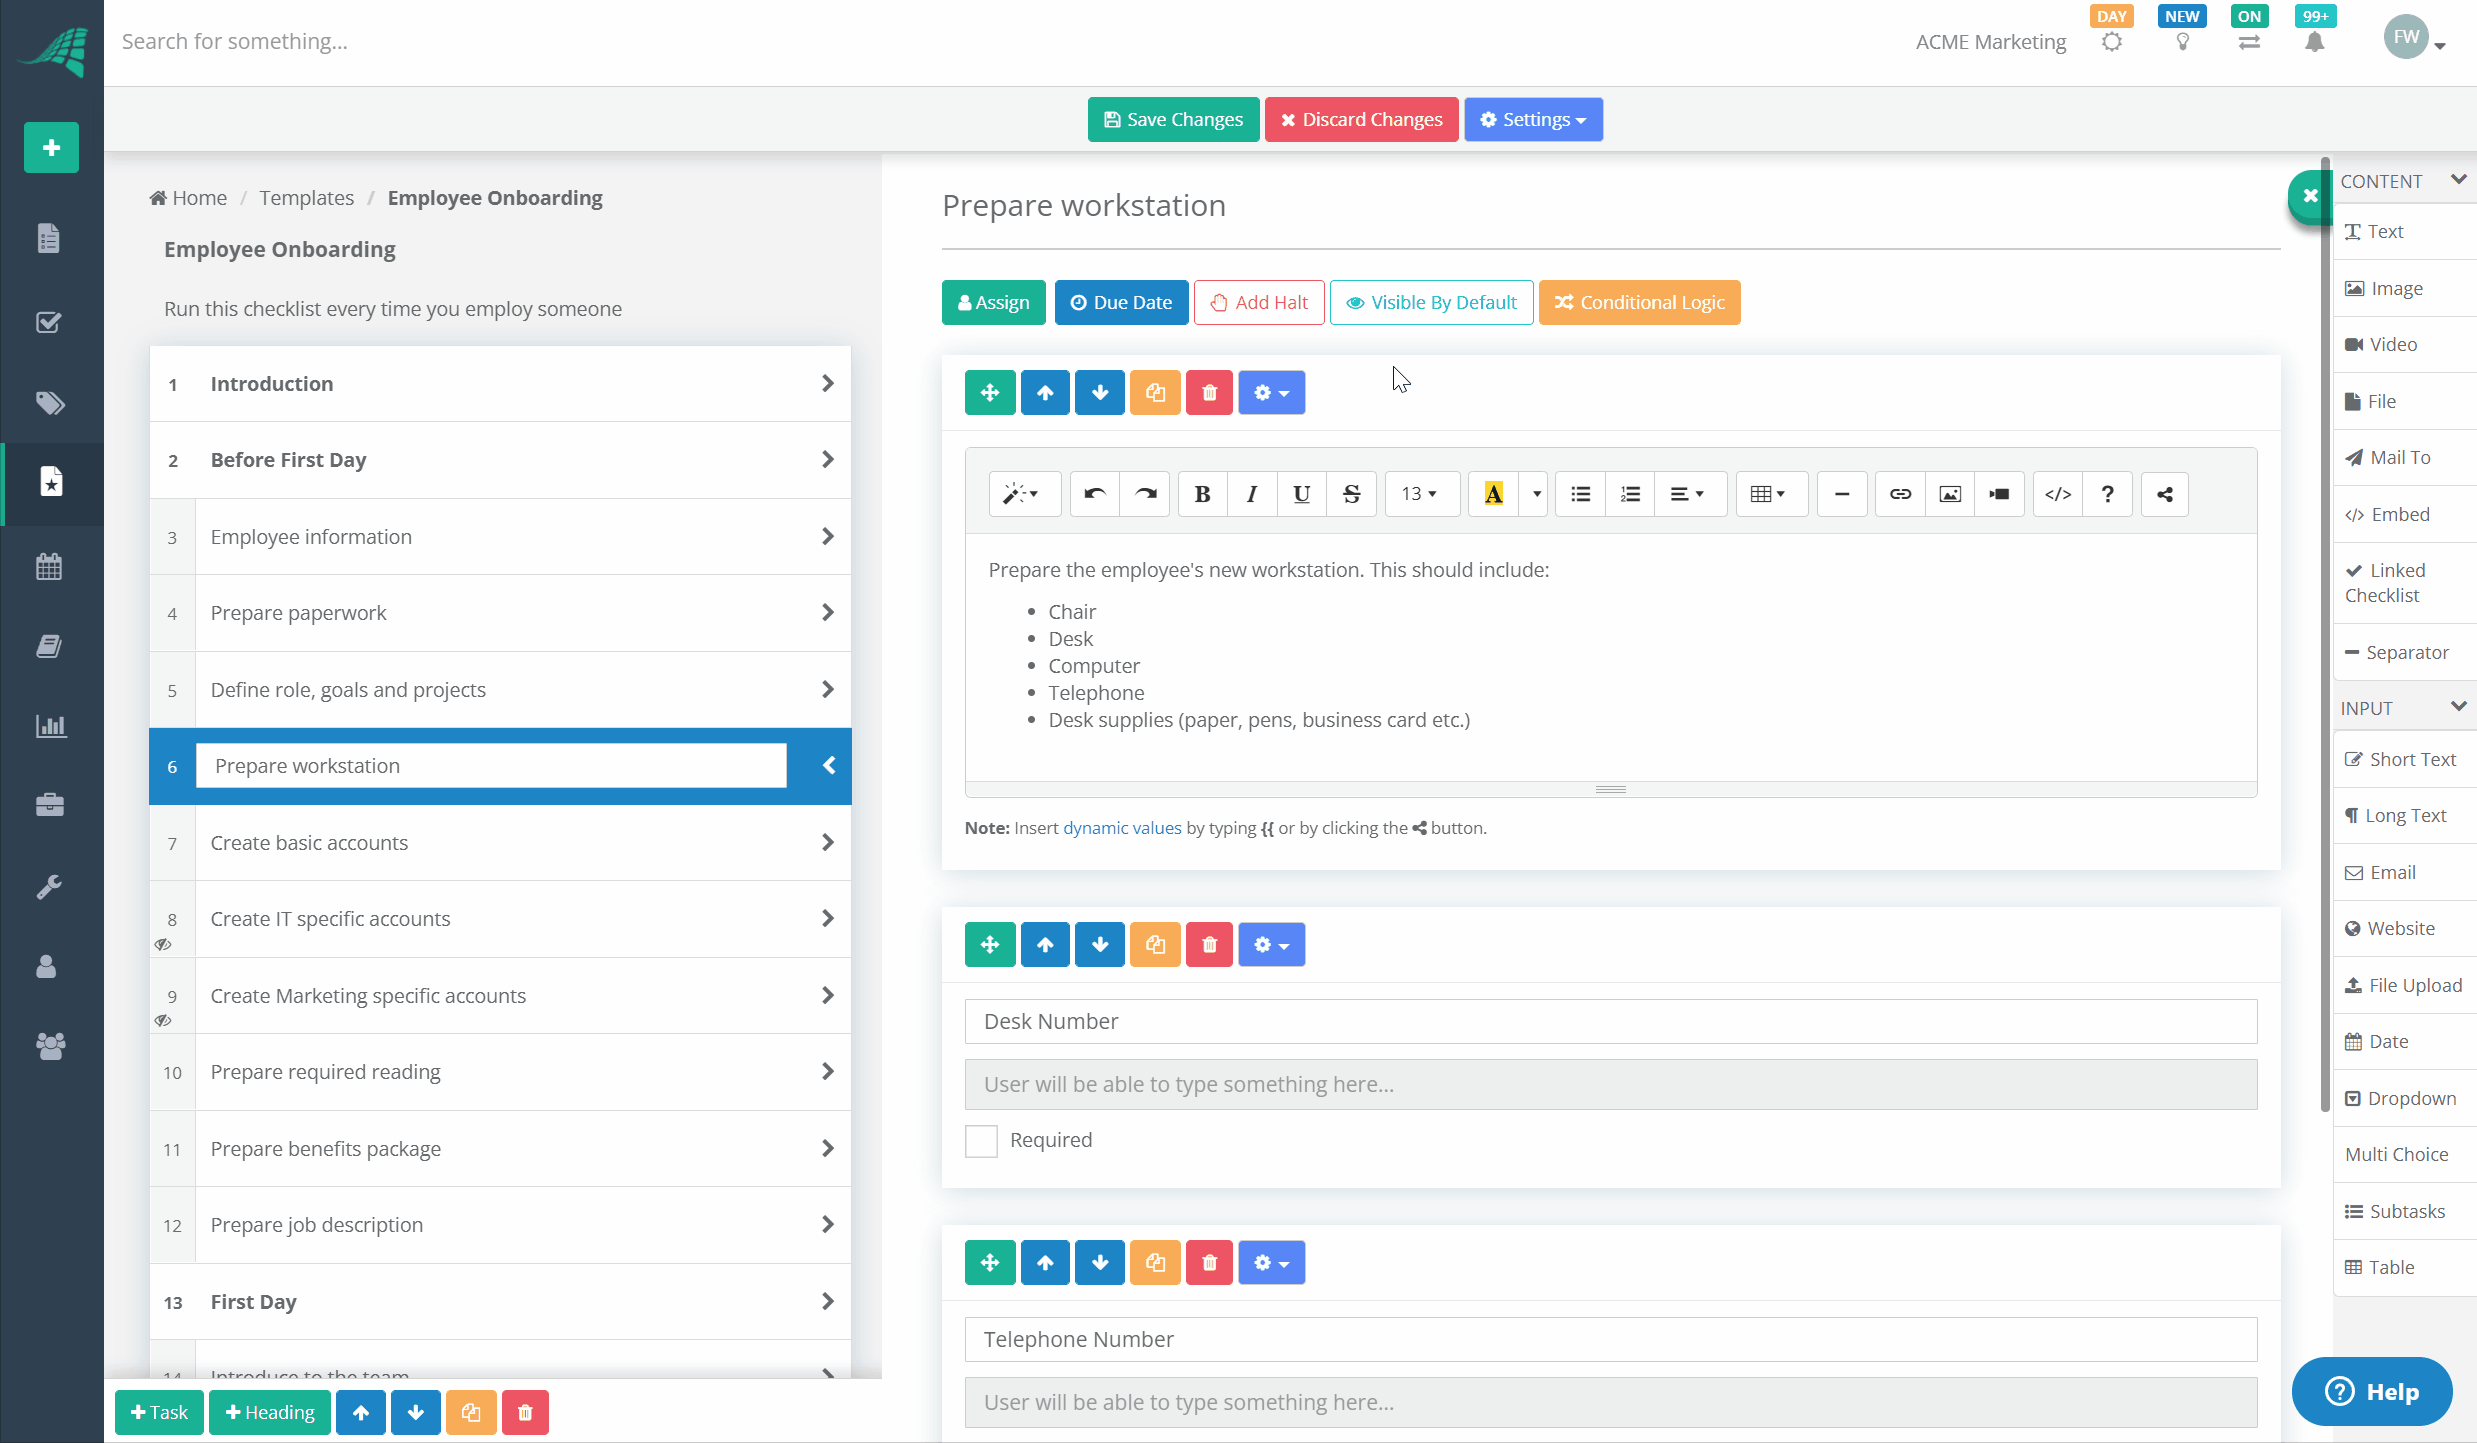
Open your template and select the task you want to create a dynamic due date for in the tasks list.
A toolbar is displayed at the top of the task content area. From this toolbar click the Due Date button.

A popup form will be displayed with two sections separated by an OR divider:
- The upper section (Date Offset) lets you define an offset in months, days, hours and minutes, and choose what the offset is anchored to.
- The lower section (Calendar Position) lets you select a calendar position and an optional time.
Filling in either section automatically clears the other, making it clear which mode is active.

Define your due date rule and then click the Save Changes button to close the popup and continue.
Example
In the example below we have added a dynamic due date to the Prepare Workstation task within our Employee Onboarding process template. We specified that this task should be due 7 days before the value entered in to the Hire Date control.
Modifying or Deleting a Dynamic Due Date
You can modify or delete an existing Due Date rule in the same way.
Open your template and select the task you want to edit the due date for. Click the Due Date button.
The popup form will be displayed. Make the required changes to your existing due date rule and then click the Save Changes button. To remove the due date rule entirely, click the Clear button.
Dynamic Due Dates Within Your Checklists
Dynamic due date rules are defined in your template. These rules are then applied to all checklists that are derived from your template.
The due dates are calculated automatically based on the type of rule:
- Due dates anchored to the checklist start date are calculated when the checklist is created.
- Calendar date due dates are calculated when the checklist is created, based on the checklist start date.
- Due dates anchored to the completion of a task are calculated when that task is completed.
- Due dates anchored to a date control are calculated when the date control value changes.
Override Due Dates
You can override dynamic due dates within your checklist.
Open your checklist, select the task and click on the 'Due' button. The current date and time the due date is set to will be diplayed in this button.
Use the date picker to change the due date to a new date and time. Then click the 'Save Due Date' button.
To remove the due date entirely, click the 'Clear Due Date' button and then click the 'Save Due Date' button.
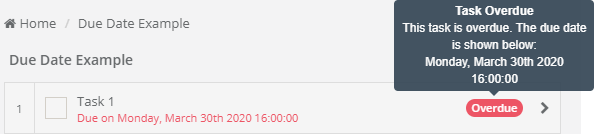
Due Date Warnings
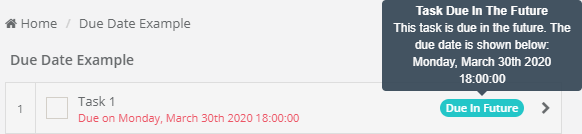
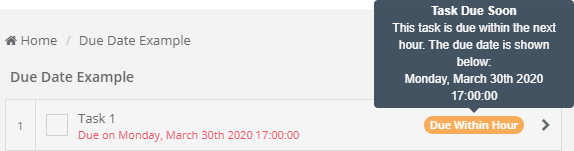
Due dates are displayed in the tasks list. The due date is displayed in small red text underneath the task name.
A color coded warning icon is also displayed. You can hover over this icon to display the full details.
The three states are as follows:
- Due In Future (Turquoise) - When the due date is greater than 1 hour in the future.
- Due Within Hour (Orange) - When the due date is within the next hour.
- Overdue (Red) - When the due date has passed.
Task Overdue Emails & Inbox Notifications
When a task becomes overdue an email and inbox notification is sent to all task assignees. If there are no task assignees we send these to all team members in the Administrator role.
The email contains the details of the overdue task and a clickable link which will take the user straight to the overdue task.

Unsubscribe From Overdue Emails
Users can unsubscribe from receiving overdue emails in their user settings.
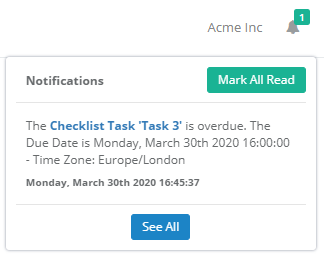
Inbox Notification
The inbox notification can be accessed by clicking on the bell icon located at the top right.
The details of the overdue task are displayed in the notification message and a clickable link is included which will take the user straight to the overdue task.