Create, Edit and Delete Tasks
Create Tasks
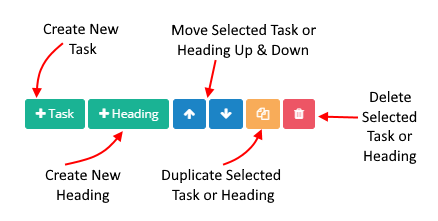
To create a new task either press the Enter key whilst you're in an existing task, or click on the '+ Task' button in the toolbar at the bottom of the tasks list area.
Edit Tasks
To edit a task you must select the task by clicking it in the tasks list. The task will be highlighted blue to show that it is selected.
The task title will change to a text box. You will be able to edit the task title using this text box.
The content for the selected task will be displayed in the task content area, which you can also edit.
Duplicate Tasks
It is quite common to have many tasks with the same content controls. Rather than adding the same controls to each individual task, you can save a lot of time by setting up one task and then duplicating it as many times as you require.
To duplicate a task, click on the yellow 'Duplicate Selected Task' button in the toolbar at the bottom of the tasks list area.
The duplicated task will be inserted in to the tasks list one position below the task you duplicated.
When a task is duplicated the task name, all content controls and all settings (including due dates, assignments, halt status, hidden status and even conditional logic) are copied.
Delete Tasks
To delete a task you must select the task by clicking it in the tasks list. The task will be highlighted blue to show that it is selected.
Click the 'Delete Selected Task' button in the toolbar at the bottom of the tasks list area.
Task Display Order
You can drag and drop the tasks to change the order in which they're displayed.
Hover over the order number on the left and your cursor will change to a cross-hair. Drag and drop the task to where you want it.
If you prefer, you can also move the tasks using the up and down buttons in the toolbar at the bottom of the tasks list area.
Headings
Headings do not have a checkbox, they're read only.
Headings are typically used for the following reasons:
- To break up your tasks in to sections for better readability.
- To provide additional information (e.g. Text, Images, Video, Files) to the user.
- To give an introduction to the checklist.
To create a new heading click on the '+ Heading' button in the toolbar at the bottom of the tasks list area.
Headings are edited, deleted and ordered in the same way as tasks are. See the sections above for further details.
Next Steps
Now that we have created some tasks we can add content using the content controls.