Mail-To Control
The Mail-To control lets you compose pre-written emails in your templates so that they can be sent directly from a running checklist. You can use Dynamic Values to automatically populate fields with data captured by other controls in the same checklist.
Add to the Template
Add the Mail-To control from the controls toolbar inside the Template editor.

Fields
The Mail-To control contains the following fields. Every field supports Dynamic Values (see below for how to insert them).
| Field | Description |
|---|---|
| To | The recipient's email address. Separate multiple addresses with a comma or semicolon. |
| Cc | Carbon-copy recipients. |
| Bcc | Blind carbon-copy recipients. |
| From | The sender address shown to the recipient. Leave blank to use your team's default sending address. Supports dynamic values. |
| Reply-To | Address that replies are directed to. Leave blank to use the From address. Supports dynamic values. |
| Subject | The email subject line. |
| Body | The email body. The available editor depends on the Format (Body Mode) selected — see below. |
Note: The From and Reply-To fields are only shown when the Format is set to Rich Text or HTML (i.e. when the email is sent directly from CheckFlow). They are hidden in Plain Text mode because that mode opens your local mail client rather than sending through CheckFlow.
Custom sender domain: By default, emails are sent from your team's CheckFlow sending address. If you have configured a custom sender domain in Team Settings, you can enter an address from that domain in the From field to send as your own domain (e.g.
notifications@yourcompany.com). See Custom Sender Domain for setup instructions.
Body Format (Body Mode)
The Format selector lets you choose how the email body is authored and delivered. There are three modes:
Plain Text
- The body is entered as plain text with no formatting.
- When triggered in a checklist, clicking the button opens a draft in the user's default mail client (via a
mailto:link). The email is not sent directly from CheckFlow. - Use this mode when you want the user to review and send the email themselves from their own mail client.
Rich Text
- The body is composed using a rich text editor (Summernote) that supports formatting, images, and file attachments.
- The email is sent directly from CheckFlow.
- The full set of send fields becomes available: From, Reply-To, Send Mode, and Attachments.
HTML
- The body is written as raw HTML, giving full control over email layout and design.
- Like Rich Text, the email is sent directly from CheckFlow.
- Suitable for branded or custom-designed email templates.
- Dynamic values can be inserted into the HTML source.
Send Mode
When the Format is Rich Text or HTML, a Send Mode dropdown controls how and when the email is sent. There are three options:
| Send Mode | Value | Behaviour |
|---|---|---|
| Optional – Manual Send | 0 | The user may click Send Email at any time. Sending is optional and does not affect task completion. |
| Required – Manual Send | 1 | The user must click Send Email before they can mark the task as complete. A warning indicator is displayed beneath the Send button as a reminder. |
| Auto Send on Task Completion | 2 | The email is sent automatically the moment the task is completed. No manual action is required from the user. |
Tip: Use Required – Manual Send to enforce accountability — for example, ensuring a notification email is always dispatched as part of a workflow step. Use Auto Send on Task Completion to fully automate notifications without any user interaction.
File Attachments
When the Format is Rich Text or HTML, you can attach files from File Upload controls on the same template. The attachment selector lists all available File Upload controls by name; check the ones whose files should be attached to the outgoing email.
If one or more attachment sources are selected, a note is displayed beneath the Send button in the checklist indicating how many file upload controls will contribute attachments.
Inserting Dynamic Values
Dynamic values can be inserted into any field of the Mail-To control (To, Cc, Bcc, From, Reply-To, Subject, and Body).
There are two ways to insert a dynamic value:
- Click the Insert Dynamic Value button ( ) to the right of the field.
- Type
{{anywhere inside the field.
Either approach opens a selection popup listing all available dynamic values in alphabetical order. Type to filter the list, then select the desired value. The placeholder is inserted into the field displayed as blue text wrapped in curly braces. Delete a placeholder with your Backspace or Delete key.
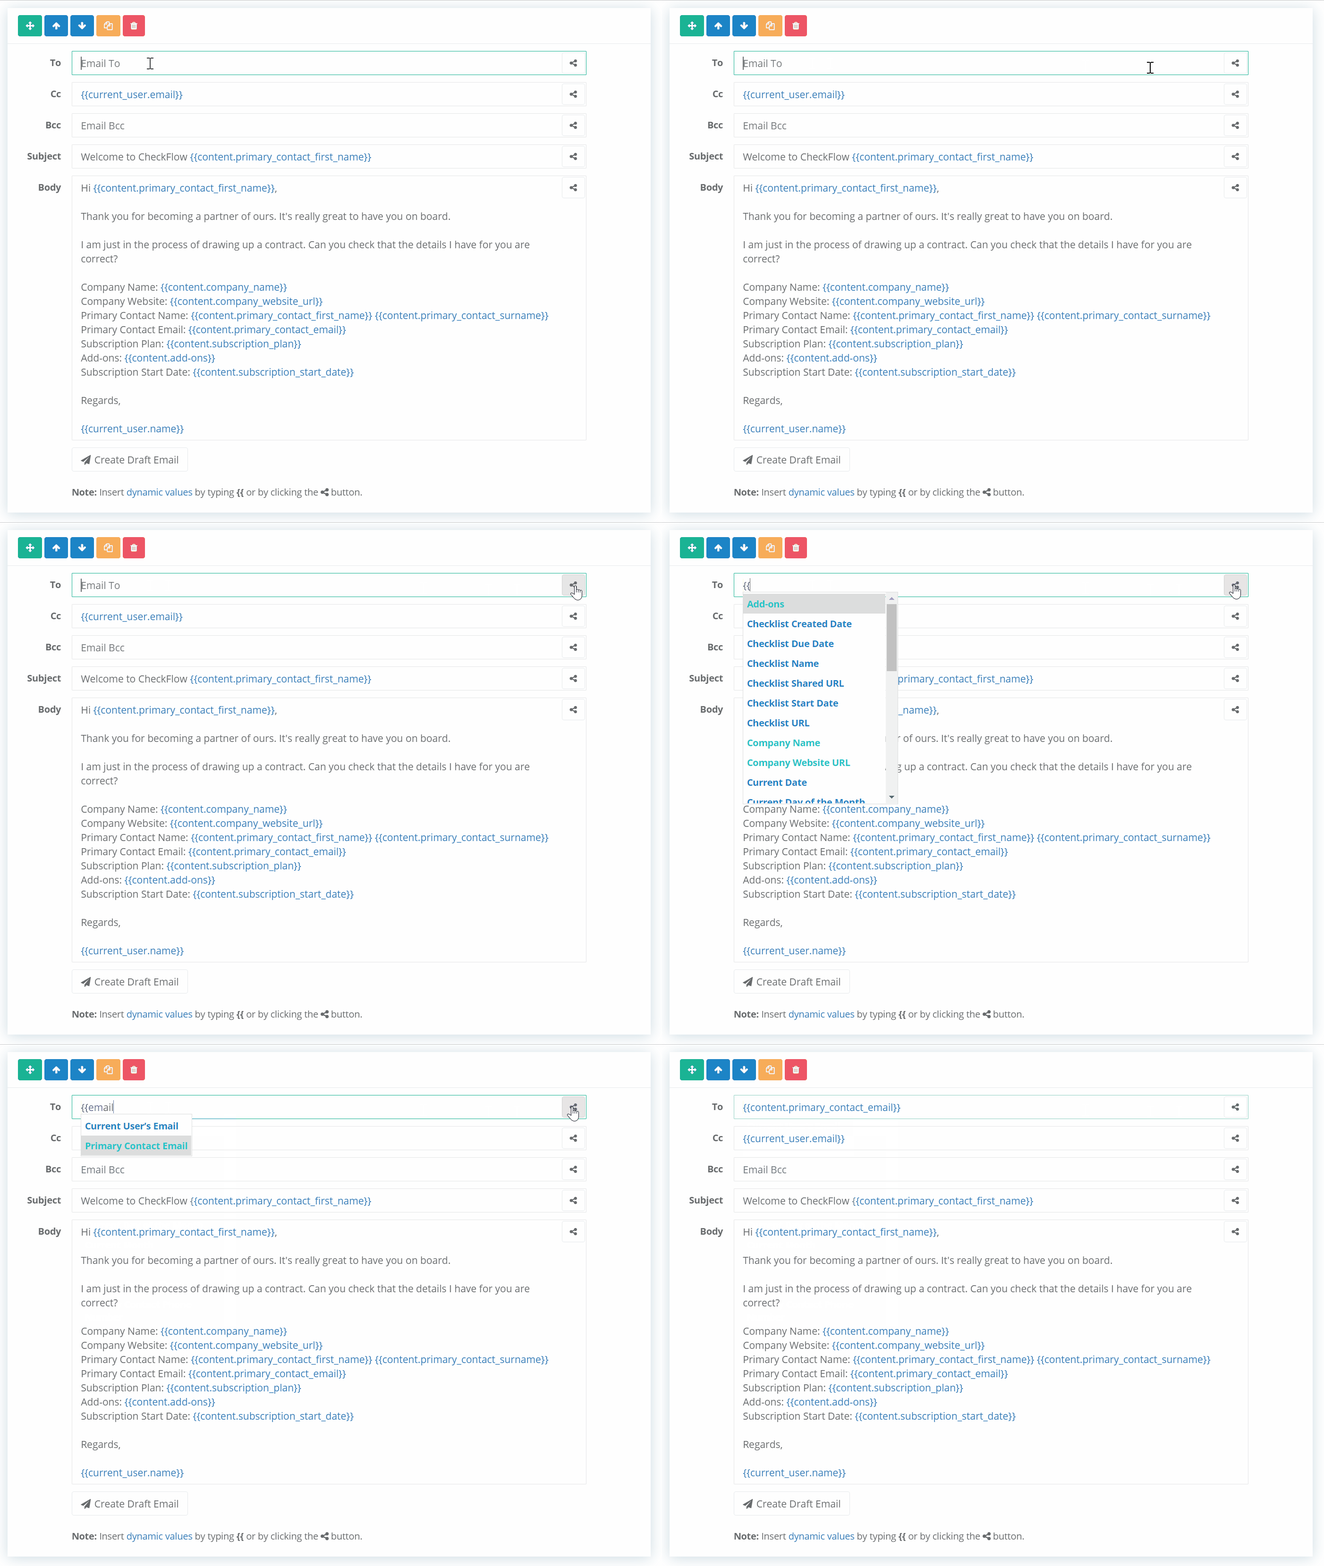
Dynamic values are resolved at checklist runtime:
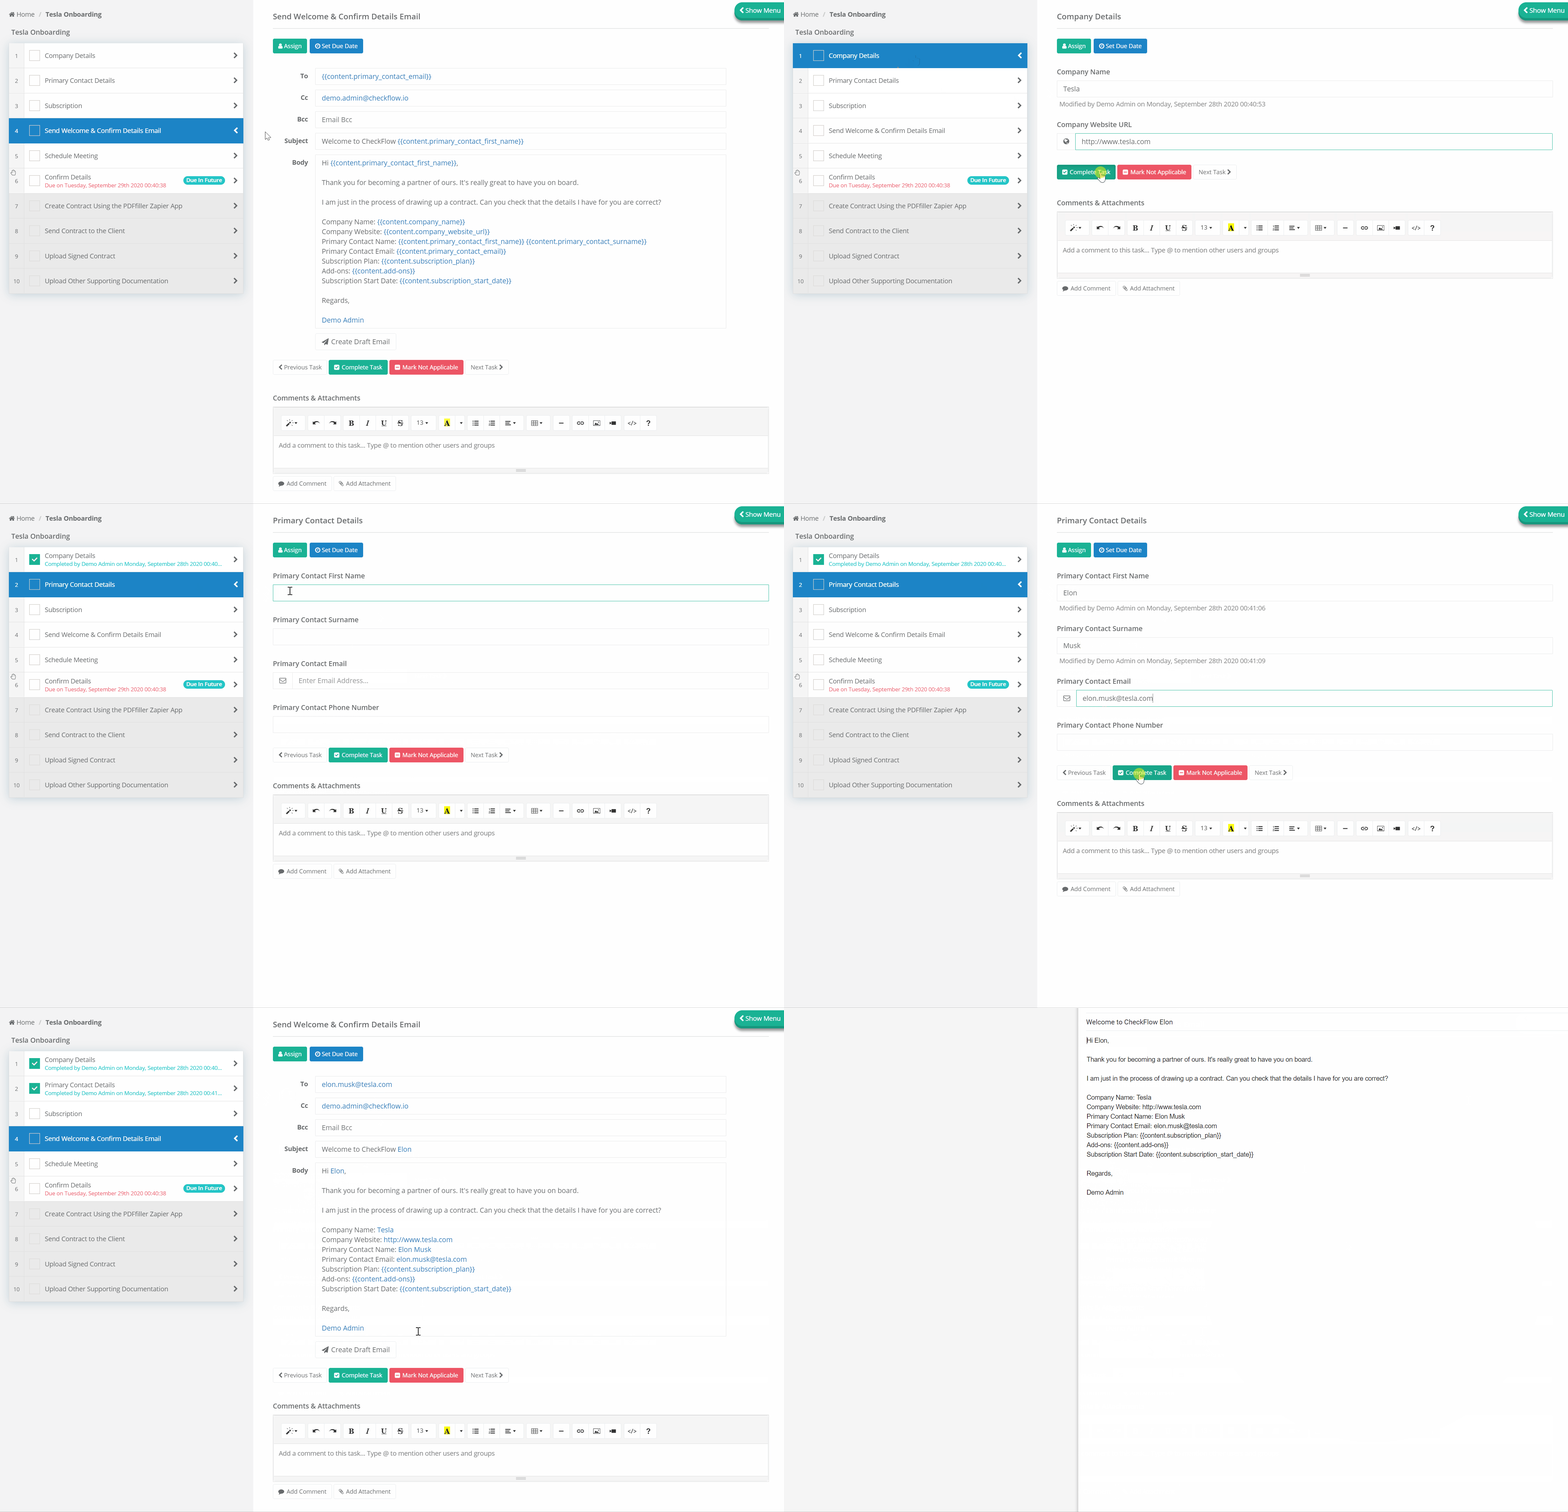
- Global Dynamic Values (e.g. checklist name, current user) are substituted when the checklist is first loaded.
- Content Control Dynamic Values (e.g. values from a Short Text or Drop-Down control) are substituted as soon as the linked control's value is updated in the checklist.
Important: If a dynamic value in the To, Cc, or Bcc field cannot be resolved at send time — for example,
{{current_user.email}}in a shared checklist where there is no logged-in user — the unresolved placeholder is treated as an invalid address and silently removed before sending. If the To field contains no valid addresses after this process, the send will fail with an error. Ensure that any dynamic values used in address fields will reliably resolve in all contexts where the checklist may be used.
Behaviour in the Checklist
How the Mail-To control behaves at runtime depends on the Format selected in the template.
Plain Text mode
- All fields (To, Cc, Bcc, Subject, Body) are editable by the user before sending.
- A Create Draft Email button opens the user's default mail client pre-populated with the field values.
- The email is not tracked by CheckFlow; no send log is recorded.
Rich Text / HTML mode
- The body is rendered as formatted content and is not editable by the user.
- A Send Email button is shown. Clicking it sends the email directly from CheckFlow.
- Depending on the Send Mode:
- Optional: the button is available but the task can be completed without clicking it.
- Required: the task cannot be completed until the email has been sent. A warning message is displayed below the button.
- Auto Send: no button is shown; the email is dispatched automatically when the task is completed.
- A Preview Email button is available in the template editor to review the rendered output before saving.
- Each send is logged. CheckFlow uses this log to enforce the Required send mode check.
Use in the Checklist — Example
The example below shows a Mail-To control with dynamic values of both types in use. Global dynamic values are resolved when the checklist loads; content dynamic values update in real time as data is entered into the linked controls.
Conditional Logic
A Mail-To control cannot be the source of a Conditional Logic rule — there is no answer to branch on.
It can be the target of a rule, so a Mail-To control can be shown or hidden by a condition driven by another control. This is a good way to keep a manual-send email out of the user's way until it becomes relevant — for example only revealing an escalation email when a Drop-Down records a failed inspection.
Hiding a control with a condition affects what is displayed; it does not disable Auto Send on Task Completion. A Mail-To control that is hidden by a condition and set to Auto Send will still be sent when the task is completed. If an email should only go out in certain circumstances, use Optional – Manual Send and hide the control, rather than relying on a condition to suppress an auto-send.
Auto Send Behaviour
Auto-sent emails are dispatched by a background process shortly after the task is marked complete, rather than while the user waits. This means:
- The user is not held up by the send, and a slow mail server cannot block task completion.
- The email will not appear in the send log instantly. Allow a few moments before checking.
- Each Mail-To control auto-sends once per checklist. If a task is re-opened and completed again, a control that has already sent successfully is skipped rather than sending a duplicate.
Reporting
The Mail-To control does not capture an answer, so it is not available as a column in Reports.
Sends made in Rich Text and HTML mode are logged against the checklist, and CheckFlow uses that log to enforce the Required – Manual Send check. Emails created in Plain Text mode are handed to the user's own mail client and are not logged.
Limits
| Limit | Value |
|---|---|
| Body formats | 3 — Plain Text, Rich Text, HTML |
| Send modes | 3 — Optional, Required and Auto Send. Available in Rich Text and HTML only. |
| Auto sends | Once per checklist. A control that has already sent successfully is skipped if the task is completed again. |
| Attachment sources | File Upload controls on the same template |
| Recipients | Plain Text: no limit — the email is handed to your own mail client. Rich Text and HTML: 5 per field, so at most 15 across To, Cc and Bcc. |
| Maximum attachment size | No limit |
| Re-sends | 2. A Rich Text or HTML email cannot be sent from the same control more than twice. |
Notes and Limitations
- The Mail-To control cannot take part in Linked Checklist control mappings, as either the parent or the child side.
- The Mail-To control does not support binding to Template Parameters. To vary the recipients per checklist, use a parameter or a control elsewhere in the template and insert it into the To field as a dynamic value.
- Like every other control, a Mail-To control can be given a Tooltip from its settings cog.
Summary of Template Configuration Options
| Option | Plain Text | Rich Text | HTML |
|---|---|---|---|
| To / Cc / Bcc / Subject | Yes | Yes | Yes |
| From / Reply-To | — | Yes | Yes |
| Dynamic values in all fields | Yes | Yes | Yes |
| Rich text editor (formatting, images) | — | Yes | — |
| Raw HTML body | — | — | Yes |
| Send Mode selector | — | Yes | Yes |
| File attachment sources | — | Yes | Yes |
| Sent directly from CheckFlow | No | Yes | Yes |
| Preview Email button | — | Yes | Yes |
Related Pages
- E-Mail — to capture an address from the user that this control can then send to.
- Dynamic Values — how to populate the To, Subject and Body fields from elsewhere in the checklist.
- File Upload — the only source of attachments for an outgoing email.
- Custom Sender Domain — to send from your own domain rather than the CheckFlow address.
- Custom Notifications — for automated messages that are not composed as an email.