Managing Checklists
Three actions tidy up your list of checklists: renaming one so it can be recognised, archiving ones that are finished but worth keeping, and deleting ones that should not exist at all.
They differ in how far they go. Renaming changes a label. Archiving hides a checklist from your report views but keeps everything. Deleting destroys the checklist and its history permanently.
Before You Start
- To rename a checklist you must be an Administrator, or a Member with the Checklist.Menu permission — renaming is done from the checklist menu.
- To archive or delete checklists you must be an Administrator. These are bulk actions on the Reports grid and are not available to Members or Guests.
- The checklists must already exist. See Create a Checklist.
Rename a Checklist
Renaming affects only the checklist's name. Nothing else about it changes, and it stays exactly where it was in your reports.
- Locate and open the checklist.
- Click the Show Menu button on the right to expand the Checklist Menu.
- Find the text box labelled Checklist Name and change the name.
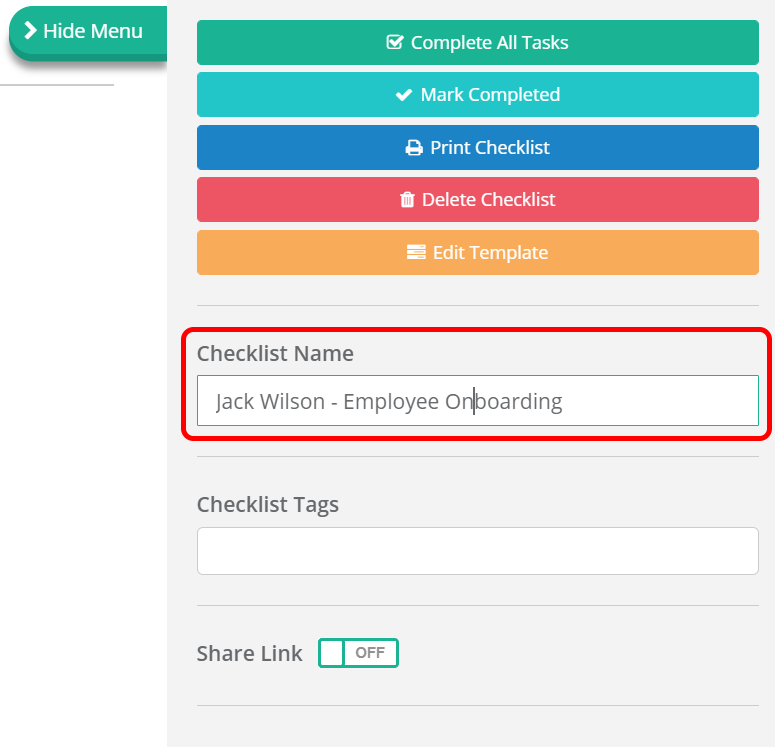
The new name is saved as soon as you finish editing the box — there is no save button. It is updated everywhere the checklist appears, including reports and notifications.
Archive Checklists
Archiving removes a checklist from the Dashboard and from every standard report view, without deleting anything. Use it for work that is finished and does not need to be in front of people any more, but that you may want to look at again.
- Go to the Reports dashboard, where your checklists are displayed in a grid.
- Find the checklists you want to archive. Use the filters to narrow the grid down.
- Click a row to select it. Hold Shift or Ctrl (Cmd on Mac) to select several at once.
- Click the Selected button.
- Choose Archive Selected Checklists. A confirmation popup appears.
- Confirm.
The checklists move to the Archived Checklists view. They are preserved in full — tasks, answers, comments, attachments and activity history are all kept.
Restoring an Archived Checklist
Archiving is reversible. Open the Report Views selector, choose Archived Checklists, select the checklists you want back, and choose Restore Selected Checklists. They reappear immediately across all standard views.
The Archived Checklists view is available to Administrators only. See Archived Checklists for the full detail on viewing, restoring and permanently deleting them.
What Happens to Attached Tasks
A task attached to the checklist follows it. Archiving takes the task out of the Tasks grid along with the checklist, and restoring the checklist brings the task back with it. The attachment itself is never broken.
While it is attached, the task counts as one of the checklist's own: it is in the progress bar, in the completed count, and in the checklist's printed view. Detaching it, or deleting it, changes those figures.
Delete Checklists
Deleting permanently removes a checklist and everything recorded in it. Before you do, consider whether archiving would serve — it clears the checklist out of your reports and can be undone.
- Go to the Reports dashboard.
- Find the checklists you want to delete. Use the filters to narrow the grid down.
- Click a row to select it. Hold Shift or Ctrl (Cmd on Mac) to select several at once.
- Click the Selected button.
- Choose Delete Selected Checklists. A confirmation popup appears.
- Confirm.
Deleted checklists are removed permanently. They cannot be recovered or restored, by you or by CheckFlow support, and their tasks, answers, comments, attachments and activity history go with them. Check the selection before you confirm.
Tasks attached to the checklist are the one exception. They were never owned by it, so they survive the deletion and carry on as ordinary standalone tasks on the Tasks grid, with no checklist behind them. They are still worked and still edited from the grid's side panel — see Edit and Delete a Standalone Task.
If It Does Not Work
| What you see | Why | What to do |
|---|---|---|
| No Show Menu button on an open checklist | You do not hold Checklist.Menu | Ask an Administrator to grant it. See User Permissions. |
| The Selected button offers no archive or delete option | You are not an Administrator | These are Administrator-only bulk actions. |
| No Archived Checklists entry in Report Views | You are not an Administrator | The view is Administrator-only. See Archived Checklists. |
Related Pages
- Open a Checklist — finding the checklist you want to manage.
- Archived Checklists — the view that restores an archived checklist, and permanently deletes one.
- Reports — the grid the archive and delete actions are performed from.
- Roles & Permissions — why these actions are Administrator-only.