Applying Tags
Tagging works the same way wherever you do it: find the tag box on the item, type a name, and pick from the suggestions or create a new tag. Only the location of the box changes.
To tag every checklist created from a template automatically, tag the template instead — see Tagging Templates.
Where the Tag Box Is
| Item | Where to find the tag box |
|---|---|
| Checklist | Open the checklist, click Show Menu, and use the Checklist Tags box in the menu panel. |
| Task | Open the checklist and click the task. The Task Tags box is at the bottom of the Task Content panel. |
| Task, from the Tasks grid | Open the task in the Tasks grid side panel. The Task Tags box sits with the task's comments and activity. This is the one box that tags a standalone task, attached to a checklist or not. |
| A standalone task being created | The Tags field in the create dialog, so a one-off job is tagged as it is written rather than found again afterwards. |
| Library item | Open the Library, click the item row, click Actions, then Edit Tags. Works for templates, articles and files. |
Adding a Tag
- Open the tag box for the item, using the table above.
- Start typing the tag name.
- If the tag already exists, select it from the autocomplete dropdown.
- If it is new, finish typing the full name, then press Enter or Tab or click away to create it.
The tag appears as a light blue label, confirming it has been added. Repeat for as many tags as you need — there is no limit per item.
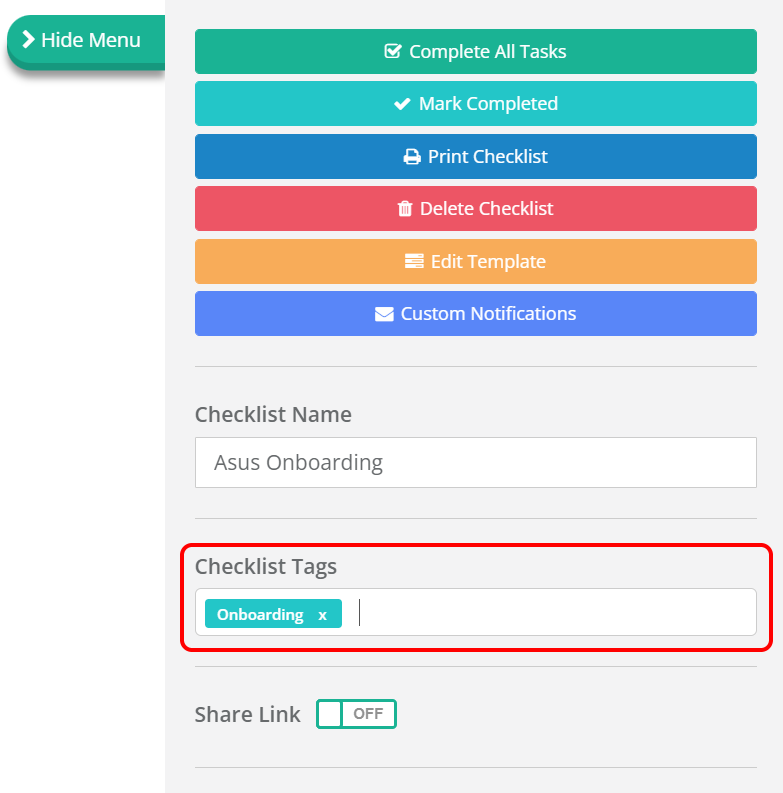
Picking an existing tag from the autocomplete reuses the same tag rather than creating a second one with the same name. Two tags that look identical but are separate objects will split your results across two Tag Pages, which is tedious to unpick later.
Removing a Tag
- Open the tag box for the item.
- Find the tag label you want to remove.
- Click the × on the right of the label.
The tag is removed from that item immediately. The tag itself continues to exist and stays on every other item it has been applied to. To remove a tag everywhere, see Managing Tags.
Tags Inherited from a Template
A checklist created from a tagged template arrives with those tags already applied — on the checklist itself, and on individual tasks where the template tagged them.
Inherited tags behave exactly like tags added by hand. You can remove them, and doing so affects only that checklist or task: the template is unchanged, and so is every other checklist created from it.
The reverse is also true. Changing a template's tags does not reach back into checklists that already exist. See Tagging Templates.
Tags on a Standalone Task
A standalone task is tagged the same way, from the Tasks grid side panel or as it is created, but its tags are held against the task itself rather than against a checklist. Attaching it to a checklist, or detaching it again, leaves them exactly where they are.
A checklist task works the other way round: its tags belong to the checklist it sits in, because the same task exists once in every checklist created from the template and each one is tagged separately. A standalone task exists once, so there is nothing for its tags to hang from but the task.
Where Tags Appear
| Item | How the tag is shown |
|---|---|
| Checklist | A label in the Checklist Tags field, and on the Tag Page. |
| Task | A label in the Task Tags field, and in the Tags column of the Tasks grid. Tasks have their own section on the Tag Page, separate from checklists. |
| Library item | A small teal label in the item row. One tag shows its name; several show a count, such as 2 Tags — hover to see the full list. |
Library items on a Tag Page are visible only to users with at least Library.Viewer. A user without Library access sees the rest of the page and nothing in the library section. See Library Roles and Permissions.
What to Tag, and Why
- By project — tag the checklists, tasks and library items for one project with its name, so the Tag Page becomes that project's index.
- By department — tag HR templates and onboarding documents HR, and the HR team has one link to everything of theirs.
- By responsibility — task tags work well for who is accountable: HR, IT, Finance.
- By status — Draft or Approved on library items, so their state is visible without opening them.
Related Pages
- Tagging Templates — tagging once so every checklist inherits it.
- Finding Tagged Items — the Tags Menu, Tag Pages and filtering.
- Managing Tags — renaming, merging and deleting tags across the team.
- Tags Overview — what tags are and where they can be applied.